[root@oem yum.repos.d]# yum install oracle-rdbms-server-12cR1-preinstall Loaded plugins: refresh-packagekit, security Setting up Install Process Resolving Dependencies --> Running transaction check ---> Package oracle-rdbms-server-12cR1-preinstall.x86_64 0:1.0-14.el6 will be installed --> Processing Dependency: gcc-c++ for package: oracle-rdbms-server-12cR1-preinstall-1.0-14.el6.x86_64 --> Processing Dependency: compat-libcap1 for package: oracle-rdbms-server-12cR1-preinstall-1.0-14.el6.x86_64 --> Processing Dependency: ksh for package: oracle-rdbms-server-12cR1-preinstall-1.0-14.el6.x86_64 --> Processing Dependency: libaio-devel for package: oracle-rdbms-server-12cR1-preinstall-1.0-14.el6.x86_64 --> Processing Dependency: compat-libstdc++-33 for package: oracle-rdbms-server-12cR1-preinstall-1.0-14.el6.x86_64 --> Processing Dependency: libstdc++-devel for package: oracle-rdbms-server-12cR1-preinstall-1.0-14.el6.x86_64 --> Running transaction check ---> Package compat-libcap1.x86_64 0:1.10-1 will be installed ---> Package compat-libstdc++-33.x86_64 0:3.2.3-69.el6 will be installed ---> Package gcc-c++.x86_64 0:4.4.7-16.el6 will be installed --> Processing Dependency: gcc = 4.4.7-16.el6 for package: gcc-c++-4.4.7-16.el6.x86_64 --> Processing Dependency: libstdc++ = 4.4.7-16.el6 for package: gcc-c++-4.4.7-16.el6.x86_64 ---> Package ksh.x86_64 0:20120801-28.el6 will be installed ---> Package libaio-devel.x86_64 0:0.3.107-10.el6 will be installed ---> Package libstdc++-devel.x86_64 0:4.4.7-16.el6 will be installed --> Running transaction check ---> Package gcc.x86_64 0:4.4.7-4.el6 will be updated ---> Package gcc.x86_64 0:4.4.7-16.el6 will be an update --> Processing Dependency: cpp = 4.4.7-16.el6 for package: gcc-4.4.7-16.el6.x86_64 --> Processing Dependency: libgomp = 4.4.7-16.el6 for package: gcc-4.4.7-16.el6.x86_64 --> Processing Dependency: libgcc >= 4.4.7-16.el6 for package: gcc-4.4.7-16.el6.x86_64 ---> Package libstdc++.x86_64 0:4.4.7-4.el6 will be updated ---> Package libstdc++.x86_64 0:4.4.7-16.el6 will be an update --> Running transaction check ---> Package cpp.x86_64 0:4.4.7-4.el6 will be updated ---> Package cpp.x86_64 0:4.4.7-16.el6 will be an update ---> Package libgcc.x86_64 0:4.4.7-4.el6 will be updated ---> Package libgcc.x86_64 0:4.4.7-16.el6 will be an update ---> Package libgomp.x86_64 0:4.4.7-4.el6 will be updated ---> Package libgomp.x86_64 0:4.4.7-16.el6 will be an update --> Finished Dependency Resolution
Dependencies Resolved
================================================================================ Package Arch Version Repository Size ================================================================================ Installing: oracle-rdbms-server-12cR1-preinstall x86_64 1.0-14.el6 ol6_latest 17 k Installing for dependencies: compat-libcap1 x86_64 1.10-1 ol6_latest 17 k compat-libstdc++-33 x86_64 3.2.3-69.el6 ol6_latest 183 k gcc-c++ x86_64 4.4.7-16.el6 ol6_latest 4.7 M ksh x86_64 20120801-28.el6 ol6_latest 759 k libaio-devel x86_64 0.3.107-10.el6 ol6_latest 13 k libstdc++-devel x86_64 4.4.7-16.el6 ol6_latest 1.6 M Updating for dependencies: cpp x86_64 4.4.7-16.el6 ol6_latest 3.7 M gcc x86_64 4.4.7-16.el6 ol6_latest 10 M libgcc x86_64 4.4.7-16.el6 ol6_latest 102 k libgomp x86_64 4.4.7-16.el6 ol6_latest 133 k libstdc++ x86_64 4.4.7-16.el6 ol6_latest 294 k
[root@oem ~]# passwd oracle Changing password for user oracle. New password: BAD PASSWORD: it is too simplistic/systematic BAD PASSWORD: is too simple Retype new password: passwd: all authentication tokens updated successfully. [root@oem ~]#
禁用iptables和SELinux
为了简化安装过程,先禁用iptables:
1 2 3 4 5 6 7 8
[root@oem ~]# service iptables stop && service ip6tables stop && chkconfig iptables off && chkconfig ip6tables off iptables: Setting chains to policy ACCEPT: filter [ OK ] iptables: Flushing firewall rules: [ OK ] iptables: Unloading modules: [ OK ] ip6tables: Setting chains to policy ACCEPT: filter [ OK ] ip6tables: Flushing firewall rules: [ OK ] ip6tables: Unloading modules: [ OK ] [root@oem ~]#
再禁用SELinux:
1 2 3 4 5 6 7 8 9 10 11 12
[root@oem ~]# vim /etc/sysconfig/selinux
# This file controls the state of SELinux on the system.
# SELINUX= can take one of these three values:
#     enforcing - SELinux security policy is enforced.
#     permissive - SELinux prints warnings instead of enforcing.
#     disabled - No SELinux policy is loaded.
#SELINUX=enforcing
SELINUX=disabled
# SELINUXTYPE= can take one of these two values:
#     targeted - Targeted processes are protected,
#     mls - Multi Level Security protection.
SELINUXTYPE=targeted
[root@oem ~]# cd /etc/security/limits.d/ [root@oem limits.d]# vim 90-nproc.conf # Default limit for number of user's processes to prevent # accidental fork bombs. # See rhbz #432903 for reasoning.
Checking Temp space: must be greater than 500 MB. Actual 35581 MB Passed Checking swap space: must be greater than 150 MB. Actual 3967 MB Passed Checking monitor: must be configured to display at least 256 colors. Actual 16777216 Passed Preparing to launch Oracle Universal Installer from /tmp/OraInstall2015-07-31_01-36-56PM. Please wait ...[oracle@oem database]$
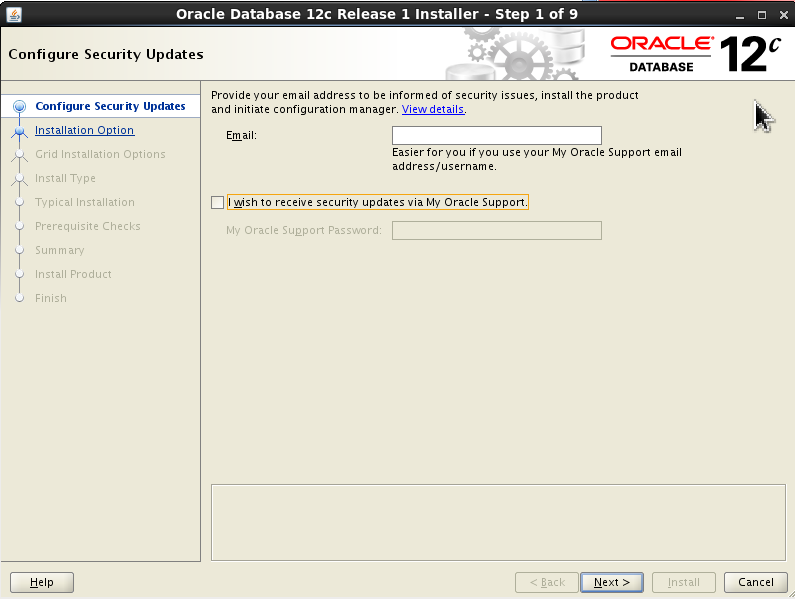
Configure Security Updates
不选择I wish to receive security updates via My Oracle Support,点击Next。
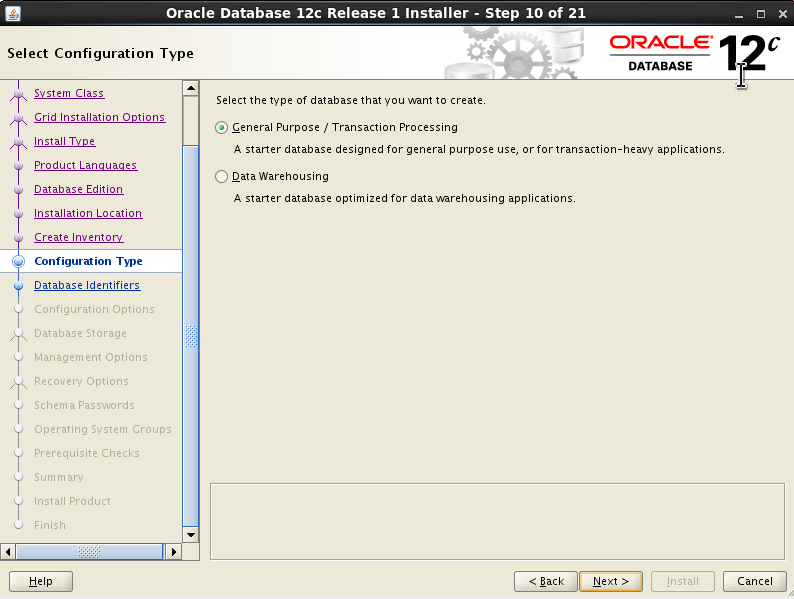
Select Installation Option
勾选Create and configure a database,点击Next。
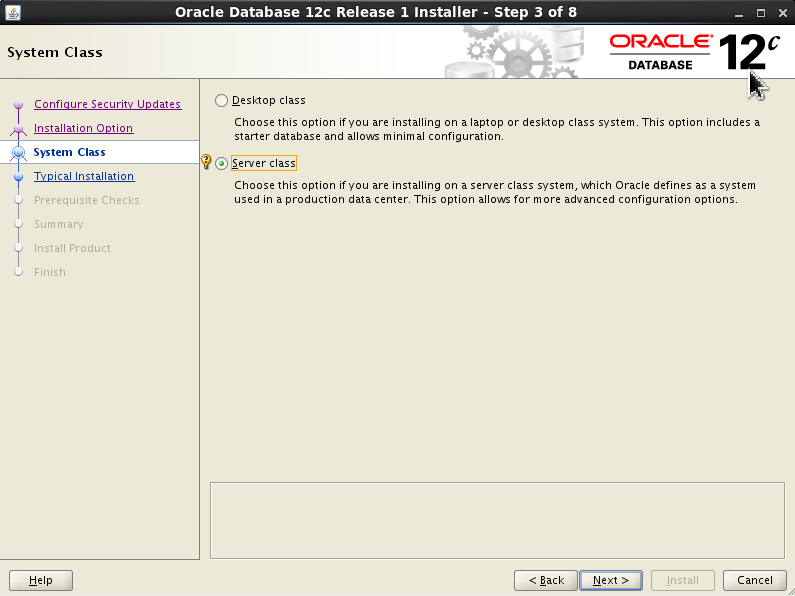
Server Class
勾选Server Class,点击Next。
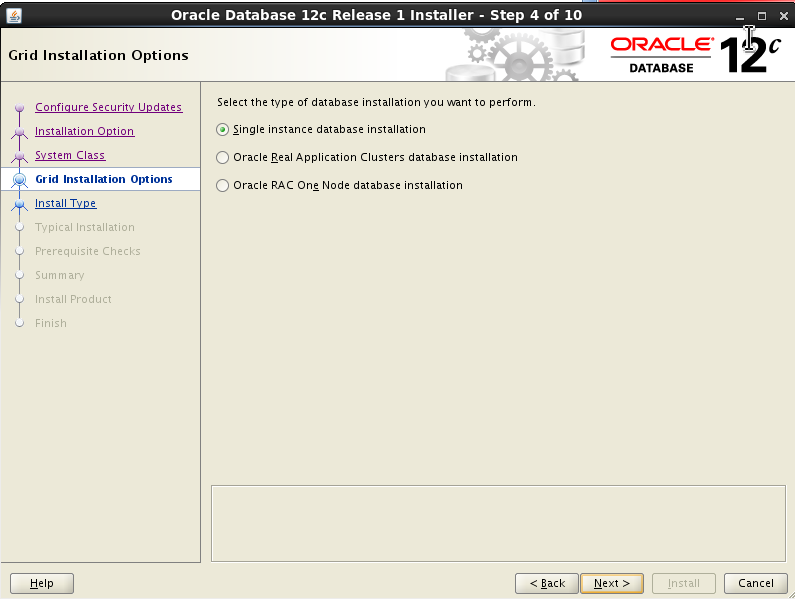
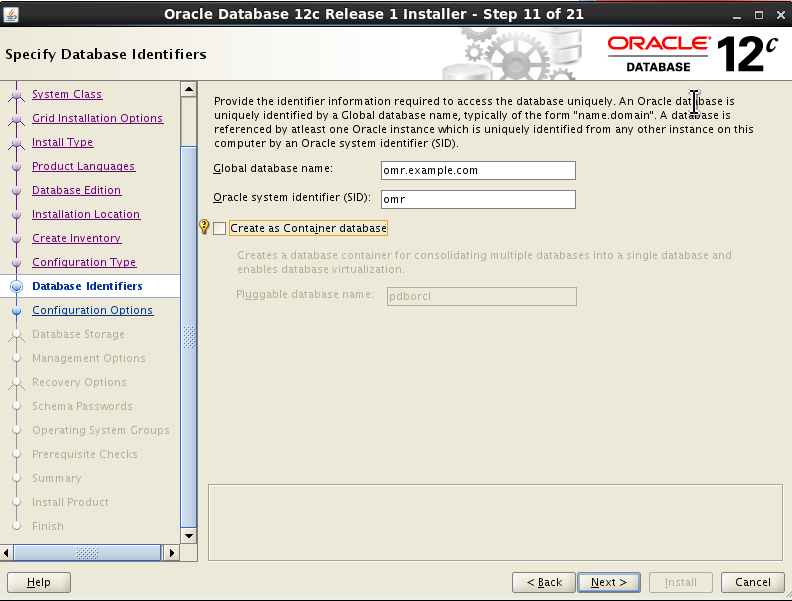
Grid Installation Options
勾选Single instance database installation,点击Next。
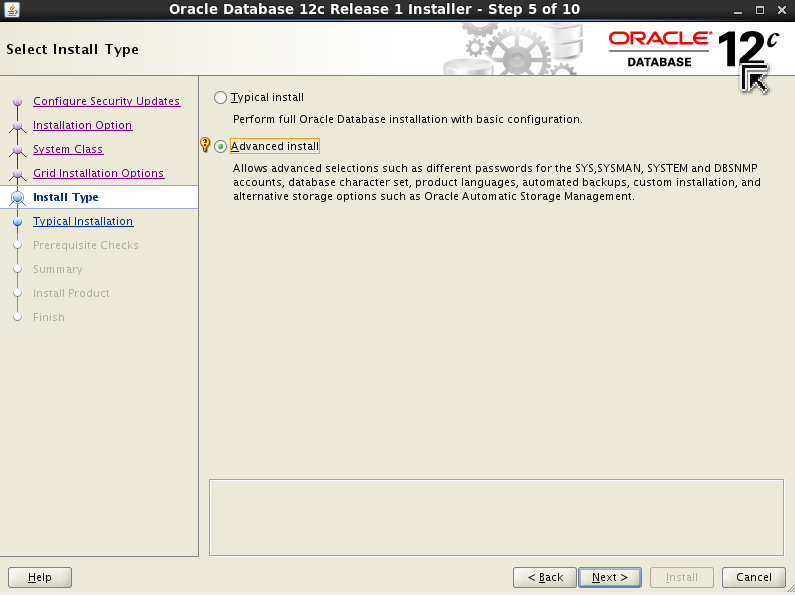
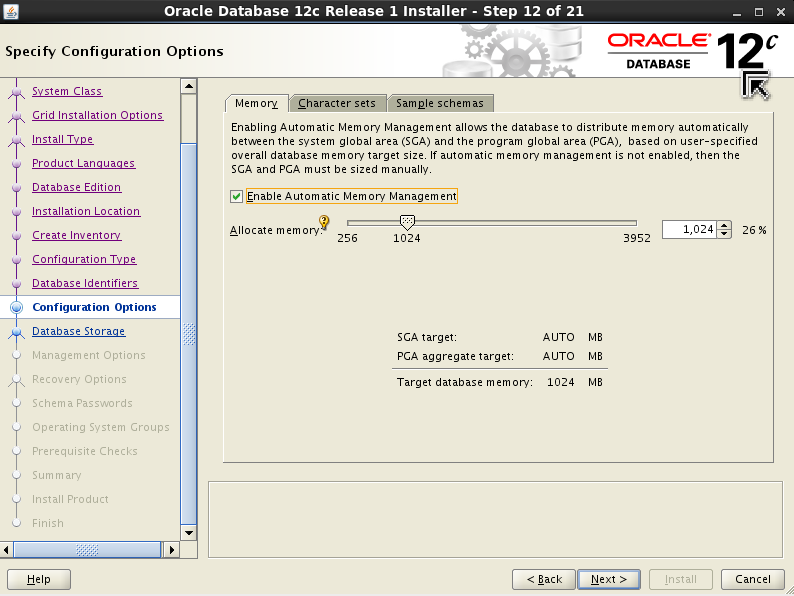
Select Install Type
勾选Advanced install,点击Next。
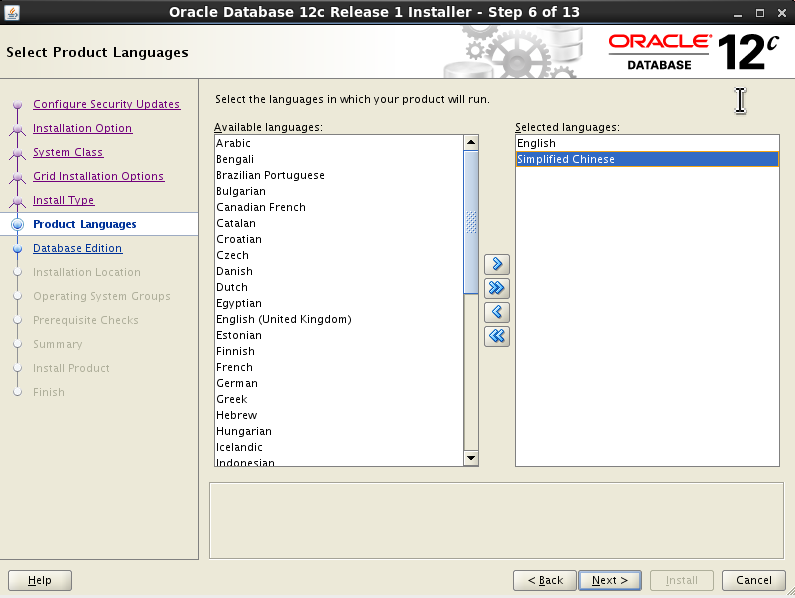
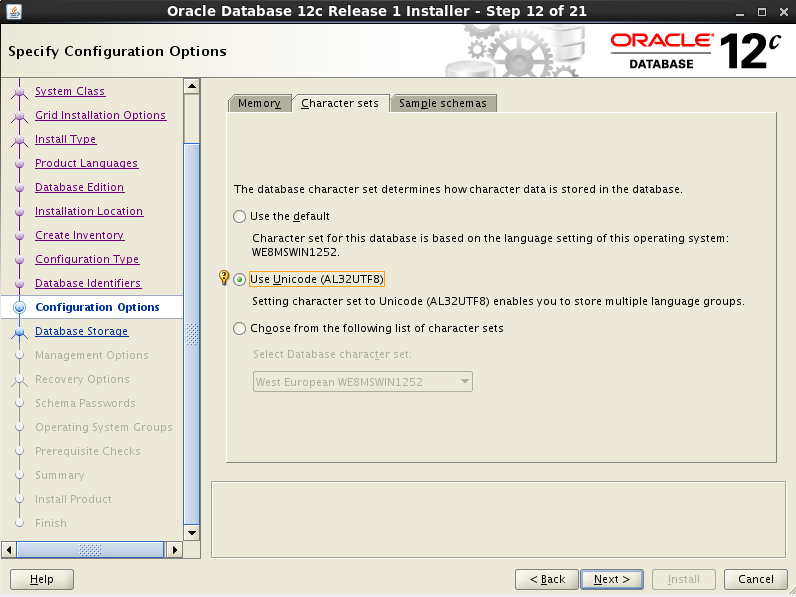
Select Product Languages
如果要支持多语言的话,勾选对应的语言,本文加入了Simplified Chinese 支持,点击Next。
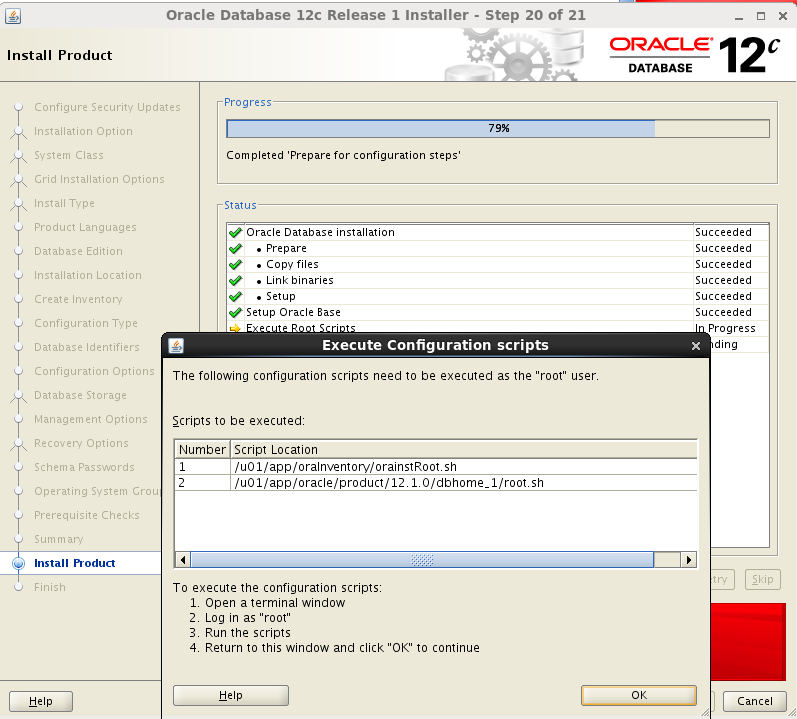
[oracle@oem ~]$ su -
Password:
[root@oem ~]# /u01/app/oraInventory/orainstRoot.sh
Changing permissions of /u01/app/oraInventory.
Adding read,write permissions for group.
Removing read,write,execute permissions for world.

Changing groupname of /u01/app/oraInventory to oinstall.
The execution of the script is complete.
[root@oem ~]# /u01/app/oracle/product/12.1.0/dbhome_1/root.sh
Performing root user operation.

The following environment variables are set as:
    ORACLE_OWNER= oracle
    ORACLE_HOME=  /u01/app/oracle/product/12.1.0/dbhome_1

Enter the full pathname of the local bin directory: [/usr/local/bin]:
   Copying dbhome to /usr/local/bin ...
   Copying oraenv to /usr/local/bin ...
   Copying coraenv to /usr/local/bin ...


Creating /etc/oratab file...
Entries will be added to the /etc/oratab file as needed by
Database Configuration Assistant when a database is created
Finished running generic part of root script.
Now product-specific root actions will be performed.
[root@oem ~]#
SQL*Plus: Release12.1.0.2.0 Production on Fri Jul 3114:49:342015
Copyright (c) 1982, 2014, Oracle. All rights reserved.
Connected to: Oracle Database 12c Enterprise Edition Release12.1.0.2.0-64bit Production With the Partitioning, OLAP, Advanced Analytics andReal Application Testing options
LSNRCTL for Linux: Version 12.1.0.2.0 - Production on 31-JUL-2015 14:59:40
Copyright (c) 1991, 2014, Oracle. All rights reserved.
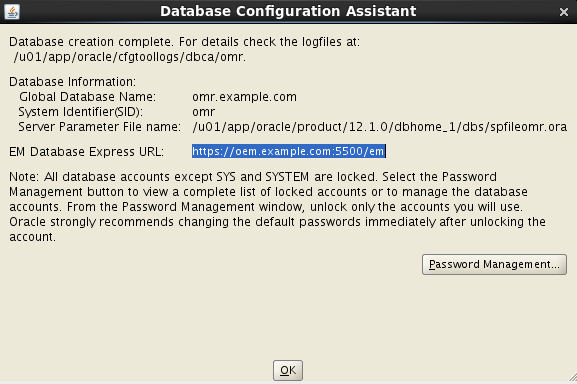
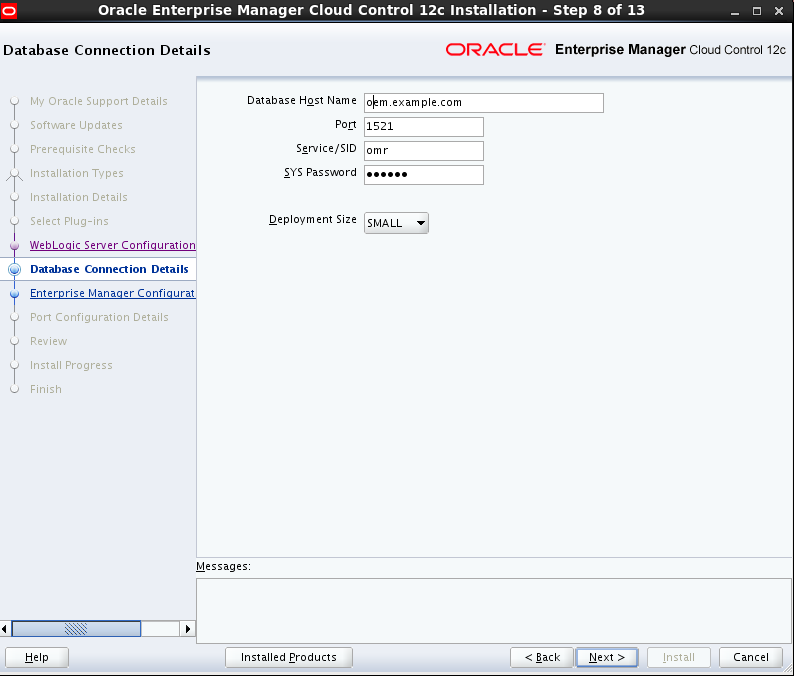
Connecting to (DESCRIPTION=(ADDRESS=(PROTOCOL=TCP)(HOST=oem.example.com)(PORT=1521))) STATUS of the LISTENER ------------------------ Alias LISTENER Version TNSLSNR for Linux: Version 12.1.0.2.0 - Production Start Date 31-JUL-2015 14:28:04 Uptime 0 days 0 hr. 31 min. 36 sec Trace Level off Security ON: Local OS Authentication SNMP OFF Listener Parameter File /u01/app/oracle/product/12.1.0/dbhome_1/network/admin/listener.ora Listener Log File /u01/app/oracle/diag/tnslsnr/oem/listener/alert/log.xml Listening Endpoints Summary... (DESCRIPTION=(ADDRESS=(PROTOCOL=tcp)(HOST=oem.example.com)(PORT=1521))) (DESCRIPTION=(ADDRESS=(PROTOCOL=ipc)(KEY=EXTPROC1521))) (DESCRIPTION=(ADDRESS=(PROTOCOL=tcps)(HOST=oem.example.com)(PORT=5500))(Security=(my_wallet_directory=/u01/app/oracle/admin/omr/xdb_wallet))(Presentation=HTTP)(Session=RAW)) Services Summary... Service "omr.example.com" has 1 instance(s). Instance "omr", status READY, has 1 handler(s) for this service... Service "omrXDB.example.com" has 1 instance(s). Instance "omr", status READY, has 1 handler(s) for this service... The command completed successfully [oracle@oem ~]$
[root@oem ~]# vim /etc/init.d/dbora #!/bin/sh # chkconfig: 345 99 10 # description: Oracle auto start-stop script. # # Set ORA_HOME to be equivalent to the $ORACLE_HOME # from which you wish to execute dbstart and dbshut; # # Set ORA_OWNER to the user id of the owner of the # Oracle database in ORA_HOME. ORA_HOME=/u01/app/oracle/product/12.1.0/dbhome_1 ORA_OWNER=oracle if [ ! -f ${ORA_HOME}/bin/dbstart ] then echo"Oracle startup: cannot start" exit fi case"$1"in 'start') # Start the Oracle databases: # The following command assumes that the oracle login # will not prompt the user for any values su - ${ORA_OWNER} -c "${ORA_HOME}/bin/dbstart $ORA_HOME" touch /var/lock/subsys/dbora ;; 'stop') # Stop the Oracle databases: # The following command assumes that the oracle login # will not prompt the user for any values su - ${ORA_OWNER} -c "${ORA_HOME}/bin/dbshut $ORA_HOME" rm -f /var/lock/subsys/dbora ;; esac
Checking Temp space: must be greater than 400 MB. Actual 14266 MB Passed Checking swap space: must be greater than 150 MB. Actual 3958 MB Passed Checking monitor: must be configured to display at least 256 colors. Actual 16777216 Passed Preparing to launch Oracle Universal Installer from /tmp/OraInstall2015-07-31_03-52-55PM. Please wait ...[oracle@oem em12104]$
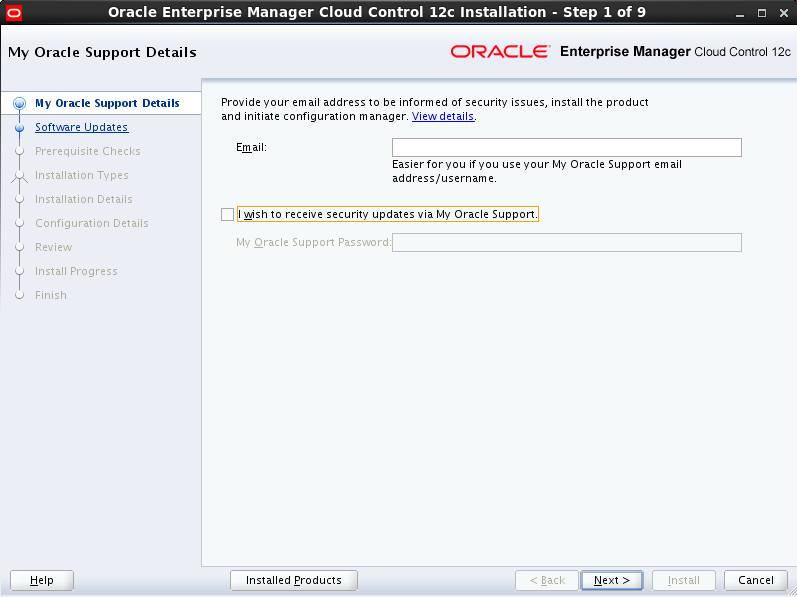
My Oracle Support Details
不选择I wish to receive security updates via My Oracle Support,点击Next。
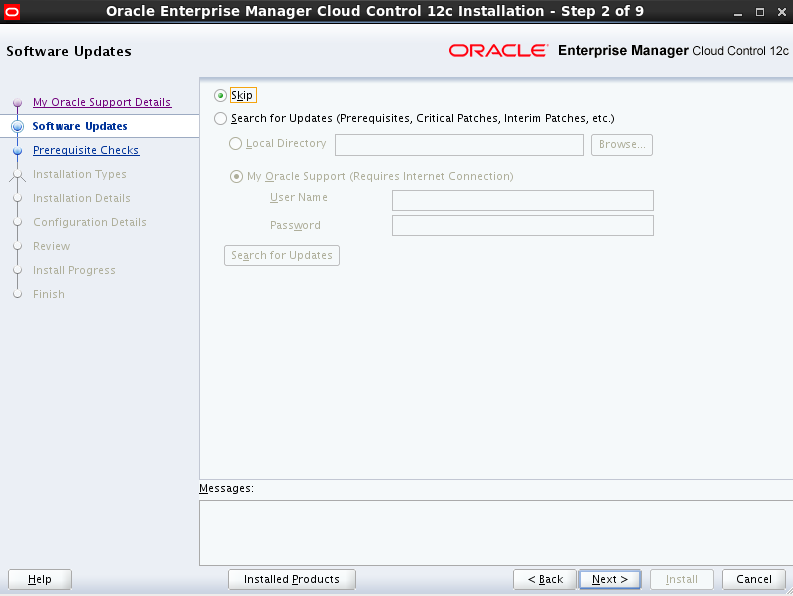
Software Updates
选择Skip,点击Next。
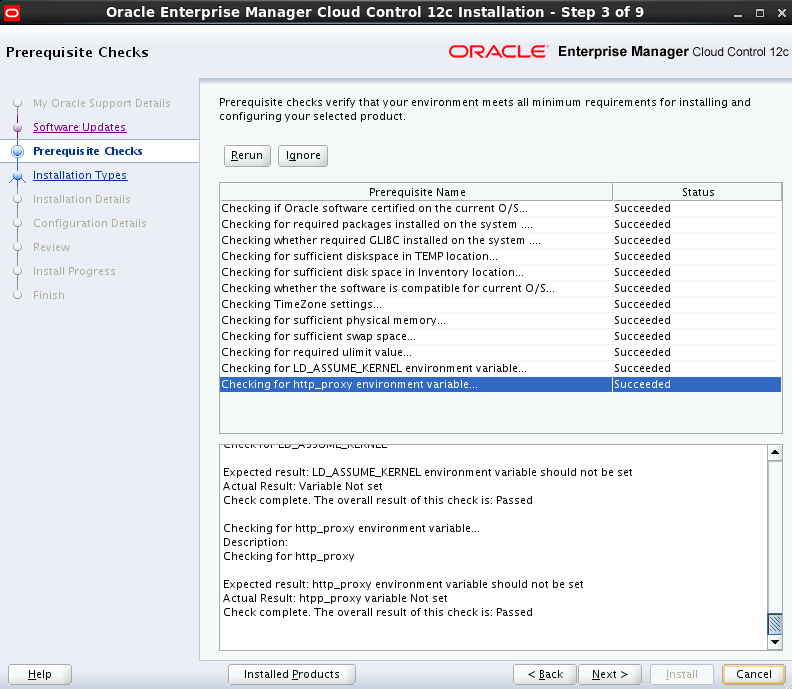
Prerequisite Checks
等待所有检查通过,点击Next。
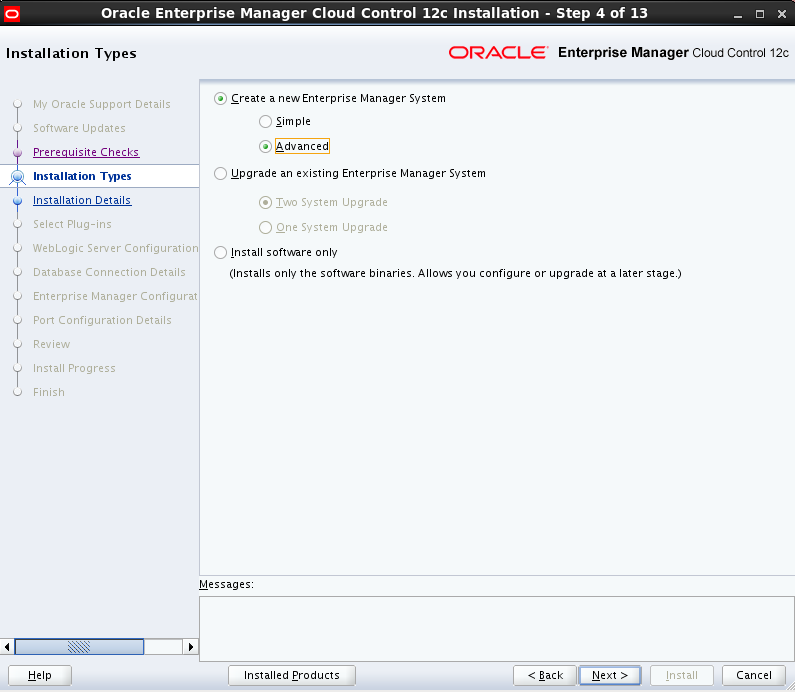
Installation Types
在Create a new Enterprise Manager System下,选择Advanced,点击Next。
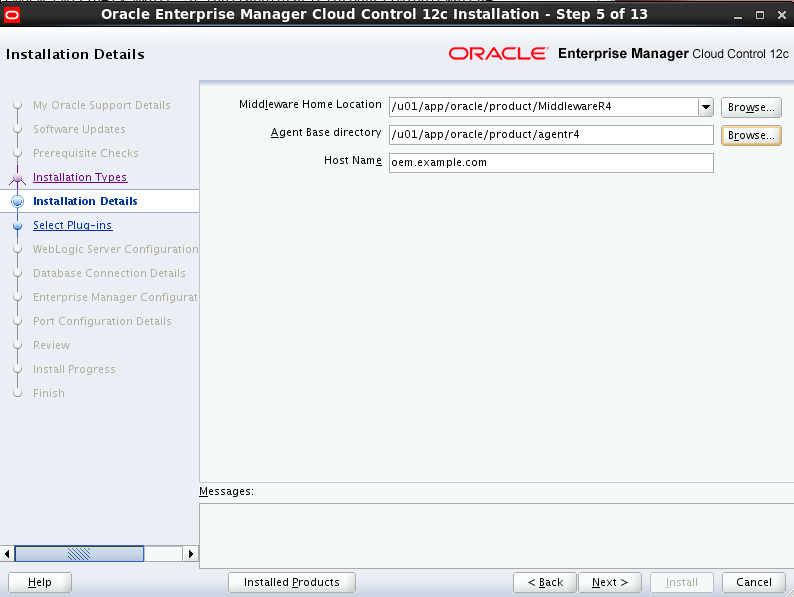
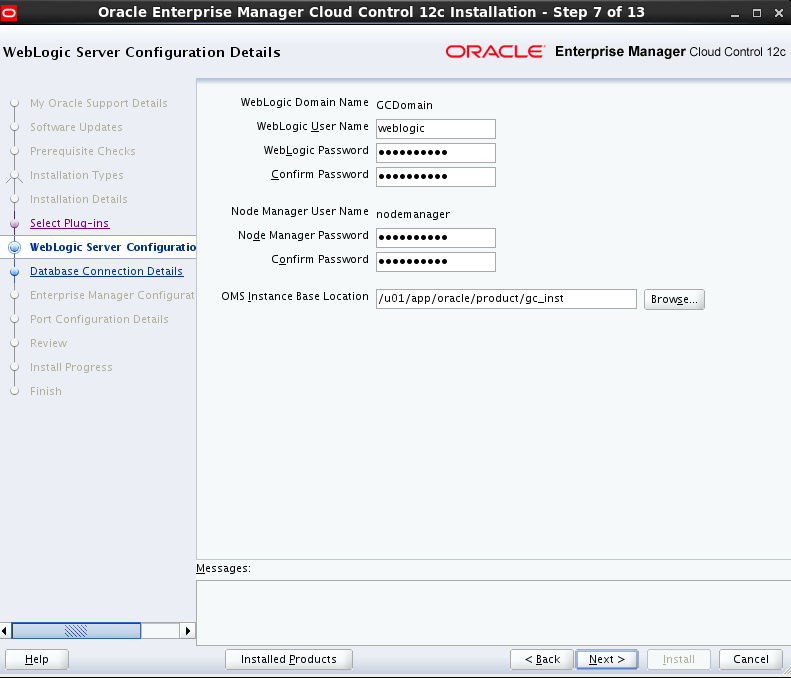
Installation Details
设置如下:
Middleware Home Location: /u01/app/oracle/product/MiddlewareR4
Agent Base directory: /u01/app/oracle/product/agentr4
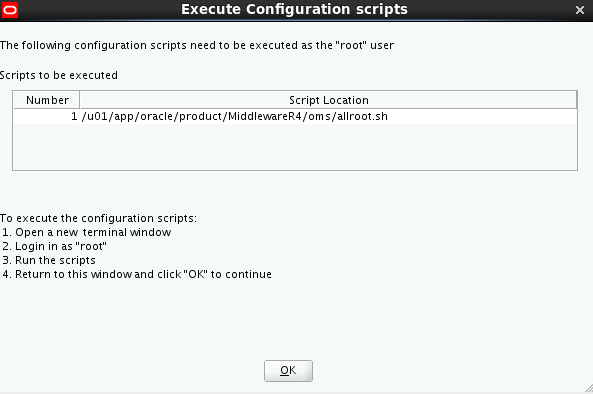
Starting to execute /u01/app/oracle/product/MiddlewareR4/oms/root.sh ...... Running Oracle 11g root.sh script...
The following environment variables are set as: ORACLE_OWNER= oracle ORACLE_HOME= /u01/app/oracle/product/MiddlewareR4/oms
Enter the full pathname of the local bin directory: [/usr/local/bin]: The file "dbhome" already exists in /usr/local/bin. Overwrite it? (y/n) [n]: y Copying dbhome to /usr/local/bin ... The file "oraenv" already exists in /usr/local/bin. Overwrite it? (y/n) [n]: y Copying oraenv to /usr/local/bin ... The file "coraenv" already exists in /usr/local/bin. Overwrite it? (y/n) [n]: y Copying coraenv to /usr/local/bin ...
Entries will be added to the /etc/oratab file as needed by Database Configuration Assistant when a database is created Finished running generic part of root.sh script. Now product-specific root actions will be performed. /etc exist
Creating /etc/oragchomelist file... /u01/app/oracle/product/MiddlewareR4/oms Finished execution of /u01/app/oracle/product/MiddlewareR4/oms/root.sh ......
Starting to execute /u01/app/oracle/product/agentr4/core/12.1.0.4.0/root.sh ...... Finished product-specific root actions. /etc exist Finished execution of /u01/app/oracle/product/agentr4/core/12.1.0.4.0/root.sh ...... [root@oem ~]#
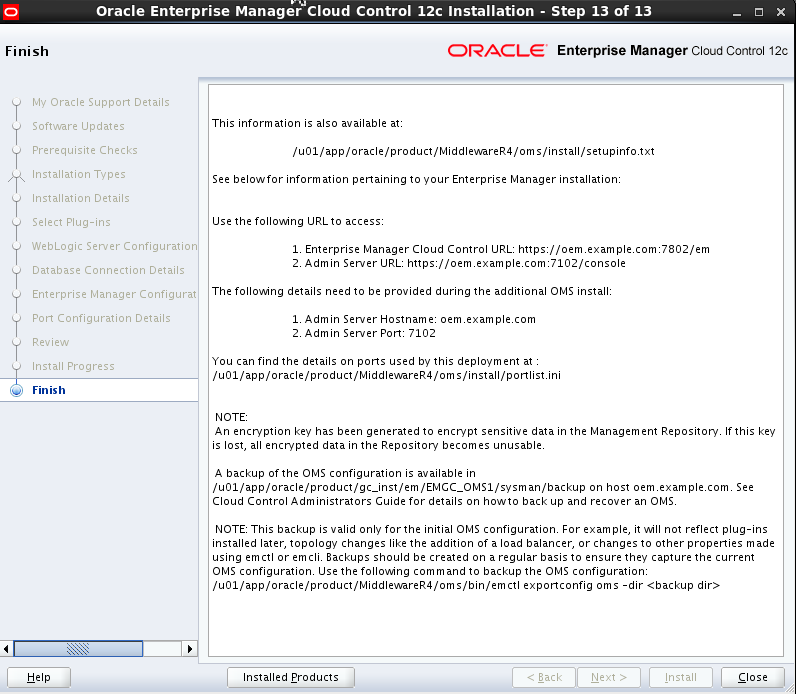
See below for information pertaining to your Enterprise Manager installation:
Use the following URL to access:
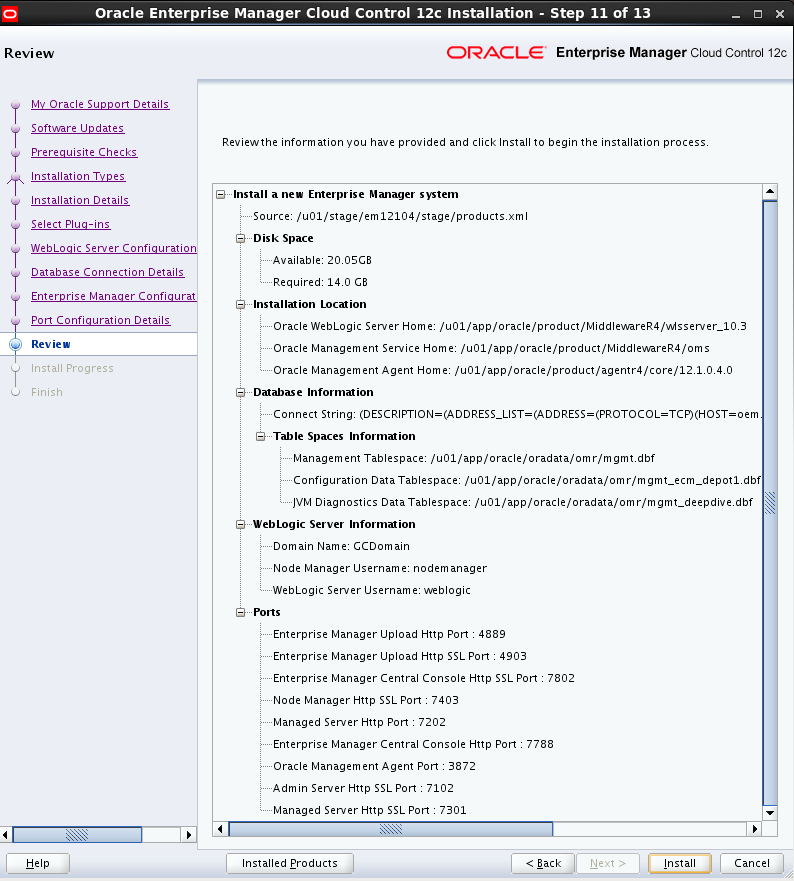
1. Enterprise Manager Cloud Control URL: https://oem.example.com:7802/em 2. Admin Server URL: https://oem.example.com:7102/console
The following details need to be provided during the additional OMS install:
1. Admin Server Hostname: oem.example.com 2. Admin Server Port: 7102
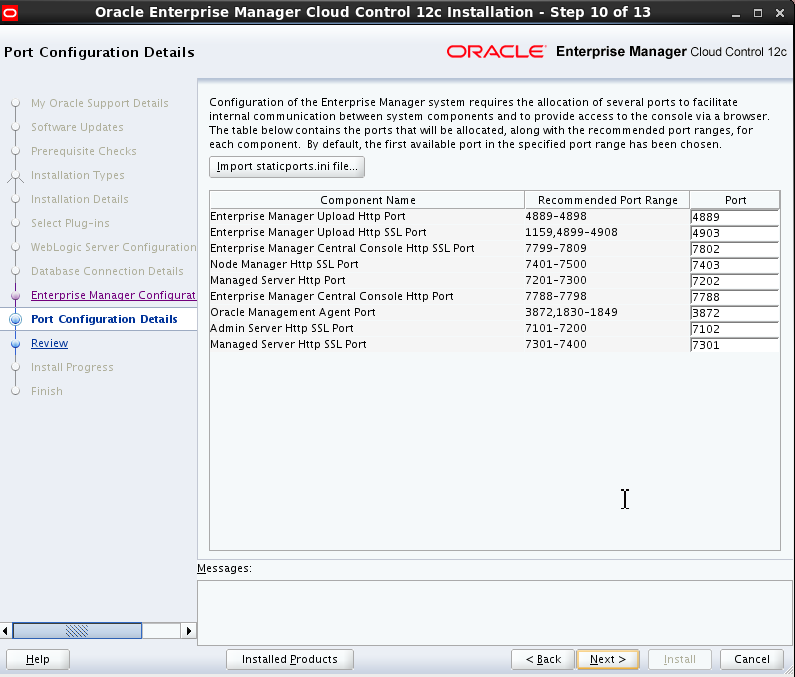
You can find the details on ports used by this deployment at : /u01/app/oracle/product/MiddlewareR4/oms/install/portlist.ini
NOTE: An encryption key has been generated to encrypt sensitive data in the Management Repository. If this key is lost, all encrypted data in the Repository becomes unusable.
A backup of the OMS configuration is available in /u01/app/oracle/product/gc_inst/em/EMGC_OMS1/sysman/backup on host oem.example.com. See Cloud Control Administrators Guide for details on how to back up and recover an OMS.
NOTE: This backup is valid only for the initial OMS configuration. For example, it will not reflect plug-ins installed later, topology changes like the addition of a load balancer, or changes to other properties made using emctl or emcli. Backups should be created on a regular basis to ensure they capture the current OMS configuration. Use the following command to backup the OMS configuration: /u01/app/oracle/product/MiddlewareR4/oms/bin/emctl exportconfig oms -dir <backup dir>